
 Reverse canvases are a fun, easy way to make great framed signs for your home using your vinyl cutting machine.
One of the benefits of a reverse canvas is there’s no worrying about stenciling or painting or bleed lines. You simply use HTV (heat transfer vinyl) to create your design.
Since there are lots of different kinds of HTV, you can even use fun ones like pattern printed, glitter or holographic vinyl to create your design.
Today we are going to show you the complete process with a step-by-step reverse canvas tutorial.
This is a guest tutorial from Sarah, my sister and one of my fab brand reps, featuring one of my latest designs “Vintage Soda Fountain” SVG.
The basic idea here is that you take an artist’s canvas, remove the canvas from the frame, stain the frame, re-attach the canvas, and then apply HTV for your design.
Reverse Canvas Tutorial
The Process
A couple of notes about this project:
- Cheap canvases work great for this! No need to go fancy.
- Before you begin, flip the canvas over and measure the INSIDE of your frame and cut your HTV design according to those measurements – that will be your visible “sign” area inside the frame.
- Don’t forget to mirror your HTV!
- Sarah has a heat press but prefers to use a small craft iron for this process.
Required Items
- A framed artist’s canvas
- Stain or paint for your frame (in this demo: Minwax “Jacobean”)
- Heat Transfer Vinyl (in this demo: red and black Siser Easyweed)
- A design of your choice (in this demo: my vintage “Soda Fountain” SVG file)
- An iron that will fit inside the canvas frame (in this demo: the Steamfast Mini Iron)
- Optional (but helpful) – a teflon sheet
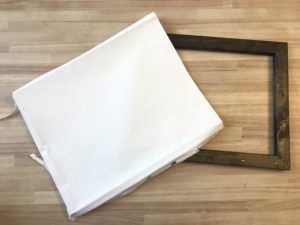 Step 1 – Remove the Staples
Pull out the staples from the back side to separate the canvas from the frame.
If there are staples on the front of the frame, remove those as well.
I use a Flat Head screwdriver and pliers.

Step 2 – Trim Your Canvas
Trim your canvas to the size of your frame on the back. I use approximately 1/4 inch margin around the back.
So if the outside of your frame measures 8×10, your canvas would measure 7.5 x 9.5.
Set the canvas aside.
 Step 3 – Stain Frame
Paint or stain your frame.
Sarah used Jacobean MinWax stain for this one. You can also paint it with any kind of paint, or wipe on paint with a wet cloth for a stained effect.
Set aside to dry for the appropriate time based on materials used.
 Step 4 – Prepare Your Design
In your design software, adjust your design to fit the space you measured before you started.
Cut your HTV (and don’t forget to mirror!).
Weed it and set it aside for now.
Step 5 – Re-attach the Canvas
Once your frame is dry, you will staple the canvas to the back of the frame.
You can either use the white side or the natural side for the front, depending on what look you are going for.
 Step 6 – Apply HTV
Flip your frame over and apply HTV using your iron.
Lift and press – do not move the iron like you would if you were ironing clothing. I find it does not need more than 4-5 seconds to adhere well!
Layer as needed, in this example, I first applied the black and then the red.
Don’t forget to use a teflon sheet or HTV backing to protect your first layer from the iron when you apply the second.
Step 7 – Get Ready To Be Envied
And there you have it! A super simple, quick, and GORGEOUS reverse canvas framed sign.

Be ready when people come over and see it… because you just know they are gonna be totally jealous 😎
It’s a good thing my designs all come with a commercial use license so you’ll be able to make some to sell them, too!
Did you like this guest reverse canvas tutorial from Sarah? Let us know in the comments if you have any questions or thoughts AND don’t forget to pin it for later 👇👇👇

Like What You See?
Sign up for updates today and receive freebie SVG Files, updates on the blog, and a FREE ebook full of unique product ideas!
Hey just FYI some of the links I use here on my blog may be affiliate links but I promise I would never link to anything that I don't legit recommend or love ❤️
Beautiful and thanks for sharing. Can you also share whT type mini iron you used?
Hey Char! Yes we have all the information for the equipment and supplies used (including the iron) in the beginning of the tutorial but in the meantime it is the Steamfast Travel iron at https://amzn.to/2sdZkfd
Hi Char! You’re welcome! And yes the iron is the Steamfast travel iron at https://amzn.to/2sdZkfd – we do list all of the equipment and supplies used at the beginning of the tutorial but I know it’s easy to miss it 🙂
Thank you Bethany for the great tutorial, I love it!
You’re welcome!
Looks like a great project.
Thanks!
Love the design, the finished product and the excellent tutorial!
Thank you!!
This looks so simple, but sounds complicated. I think I will try it. Do all canvas have the frame? Never worked with one
It is pretty simple! Stretched canvases have frames, which is what the canvas is stretched around. The thing you want to look out for is you don’t want the canvas “panels” which are canvas that is backed with a hardboard material and it’s very thin. When you’re shopping for a canvas you should be able to flip it over and see the wooden frame in the back.
Very good instructions, I’m new and it all made sense to me.
Great!
That was great tutorial, I did quite get how to reassemble canvas tho. I’m knew to all of this but hope to be make beautiful things soon
What a cute idea! Seems straight forward enough…but it just shows yet another creative mind at work. Thanks for sharing, can’t wait to get started on it!
Awesome, have fun!
OMG! I LOVE THIS thank your for sharing i have a bunch of these after having held painting classes.
Perfect!
Love the fonts you use, just fabulous. Thank you !!
Thank you and you’re welcome!
Bethany,
I have done one reverse canvas, and I have a question. How do you get the canvas pulled taut when you are ready to reframe? The one that I did the canvas is not tight and I just do not care for how that looks. Any suggestions?
Thank yo for the great tutorial!
Tawn
Hi Tawn!
So basically – you staple one side first. Do one staple towards the top, pull it tight, then staple down towards the bottom. Once you’ve gotten that side stapled, then pull it really tight and staple the opposite side. Then once you have the opposite side stapled down, then pull and staple the remaining two sides.
Thanks!
Bethany,
Thank you for the great tutorial and everything you do!!!
You’re welcome and thank you!!
I love this idea and the design! Thanks to you and Sarah for sharing 🙂
You’re welcome!
I love these simple easy to follow directions. Well written. I reattached the canvas after using my heat press to apply. I might be addicted to my heat press. Thank you
That’s what I thought also! I asked her and she told me she preferred using her iron because to her it would be easier to center the design and not get it crooked if she applied it after she’d reattached the canvas, which makes sense.
Love this, and it was a great tutorial! Thank you so much for the continued inspiration!! 🙂
You’re welcome!
Great tutorial and what a great new design. I can’t wait to see the rest. Thanks Bethany and Sarah!
You are welcome!
Great tutorial Thanks!
You’re welcome!
I have thought about trying this project for awhile and just hadn’t attempted it yet. Thanks for the great tutorial. I would be using a regular iron. What setting would you suggest?
Whatever your normal HTV settings would be for ironing… I usually use cotton/linen and make sure the steam is turned off 🙂
WOW! I Love this tutorial. I Love Sarah’s explanation on doing Reverse Canvases. I have been doing them for several months and her explanation is so much easier than the tutorial I used.
Thank you for sharing this tutorial. I am new at using a cutting machine (my wonderful husband bought me a silhouette curio). I am going to try this!
You’re welcome! I’m glad you want to try it, it’s so easy!
All new to me– but I need to give it a try…..Thanks Bethany – Larry
Do it! It will be great, I’m sure 🙂
Thanks!
Thanks so much for sharing this technique. I can hardly wait to try making one of these! I had no idea that you could do this with a canvas!!!
I have a question about Step 6. The directions say to “Layer as needed, in this example, I first applied the black and then the red. Don’t forget to use a teflon sheet or HTV backing to protect your first layer from the iron when you apply the second.” I don’t understand how you can cover the black area with a teflon sheet as you iron on the red area . What am I missing?
P.S. I love that small iron!!
Hey Donna!
Okay so what she means is this – if you, say, have a design that is mostly black but a few small colored spots… if you do the black first, and then press the red on, you are probably going to have small pieces of red (and therefore, small pieces of backing) so then when you press on the red, your iron would come in contact with the black that was already pressed.
So – you press on your first color, and then lay down your second color BUT before you press, you cover it again with a teflon sheet or the piece of backing from the first layer so your iron doesn’t touch the HTV from the first color. Does that make more sense?
Thank you for the tutorial and thank you to your sister as well. I can’t wait to try a canvas sign.
Thank you for this tutorial. I just learned something new!
Love this! One question…… Can you explain to me why you trim down the canvas in step 2 instead of rewrapping the canvas once complete.
Hi Christa!
You trim the canvas because if you wrap it around again it’ll obscure all the beautiful stained wood 🙂
Hi! Beautiful! Where can I find the SVG? Would love to make this for my sister. -as a gift. Thank you for sharing:)
Hi Evy! Thanks for commenting – I hadn’t realize I forgot to update the link! You can get the design here: https://shop.boardbattendesign.com/products/vintage-soda-fountain-svg-file
Every time I try this I get lines from my iron. Is it too hot? Or am I holding it too long?
When you say lines from you iron, you mean marks from the bottom (the holes and stuff), I assume? Assuming that’s the case, this is one of the harder parts about using an iron as opposed to a heat press. The best way to do an iron from what I remember is to keep moving it but not actually SLIDING it but just picking it up, pushing it down, etc. The longer you leave the iron in a certain spot the more likely you are to have those marks but as you go around and re-press it should get most of those out.
Thank you for the tutorial it was just so easy to comprehend. Looking forward to more